10 Essential DIY Home Organization Tools and Hacks
You're about to discover the secret to a clutter-free life with these 10 essential DIY home organization tools and hacks. Start by decluttering with storage bins and label maker organization hacks to keep your belongings in check. Next, create DIY shelving units for small spaces and repurpose old furniture pieces to maximize storage. A customizable command center board will help you stay on top of daily tasks, while budget-friendly drawer organizers keep your belongings tidy. You'll also learn how to create a home filing system, maximize closet storage capacity, and turn a pegboard into a station. Get ready to reveal the full potential of your space.
Key Takeaways
• Assign a home to each item using storage bins, considering shapes, sizes, and materials for specific organizational needs.
• Utilize DIY shelving units, such as floating shelves or ladder bookshelves, to maximize small spaces and create the illusion of more space.
• Implement a customizable command center board, tailored to fit your family's needs, with sections for calendar, chore chart, meal planning, notes, and reminders.
• Create a budget-friendly drawer organizer using cardboard, foam, or DIY inserts to transform cluttered drawers into organized spaces.
• Use label maker organization hacks to focus on labeling essentials like storage bins and shelves, making it easy to find what you need quickly.
Decluttering With Storage Bins
Start decluttering your space by assigning a home to each item using storage bins, which come in various shapes, sizes, and materials to cater to your specific organizational needs. When selecting storage bins, consider the items you need to store, the available space, and your personal style.
For instance, if you have limited floor space, opt for stackable bins or hanging organizers. If you're storing delicate items, choose bins with cushioning or dividers.
To maximize your storage bin's potential, implement creative solutions. Use bins with wheels or handles to make them easy to move around. Consider using clear bins to see what's inside without having to open them. You can also repurpose items like baskets, crates, or containers to add a personal touch to your storage.
Label Maker Organization Hacks
As you start using a label maker, you'll realize that it's not just about slapping labels on anything and everything.
You'll want to focus on labeling the essentials, like storage bins and shelves, to create a sense of order and structure in your space.
Labeling Essentials
Get your labeling game on track by investing in a reliable label maker, which will become your go-to tool for identifying and categorizing everything from storage bins to file folders.
With a label maker, you'll be able to efficiently label items in your pantry, ensuring you can quickly find what you need. Imagine being able to glance at your pantry shelves and instantly knowing what's inside each container, without having to rummage through them.
You can also use your label maker to organize your garage. Labeling storage bins, toolboxes, and shelves will help you maintain a clutter-free space and make it easier to find what you need. Plus, you'll be able to identify which items belong to each family member, reducing confusion and mess.
By labeling your belongings, you'll be able to maintain a sense of order and control in your home. With a label maker, the possibilities are endless, and your home will thank you for it.
Labeling Hidden Spaces
You'll be amazed at how a label maker can transform even the most hard-to-reach areas, like the back of a closet or inside a cabinet, into easily navigable spaces. With creative labeling, you can turn hidden compartments into functional storage solutions. No longer will you struggle to find what you need or waste time digging through clutter.
Labeling hidden spaces is especially useful for items you don't use frequently, such as seasonal decorations or out-of-season clothing. By labeling the contents of each bin or container, you'll know exactly what's inside without having to dig through everything. This organization hack also helps keep similar items together, making it easier to find what you need when you need it.
In addition to maximizing storage capacity, labeling hidden spaces can also help reduce clutter and stress. When everything has its designated place, you'll feel more in control of your space and more relaxed in your daily life.
DIY Shelving Units for Small Spaces
In compact apartments, condos, or tiny homes, building DIY shelving units is a clever way to maximize vertical storage and keep clutter at bay. By creating your own shelving units, you can tailor them to your specific needs and make the most of your space. Plus, it's a cost-effective and fun project that can add a personal touch to your home.
Here are some DIY shelving ideas to get you started:
-
DIY floating shelves: attach them to walls to create the illusion of more space and add a sleek touch to your decor.
-
Use creative corner solutions like corner shelves or carousels to make the most of often-wasted space.
-
Opt for space saving shelving like ladder bookshelves or wall-mounted foldable shelves to keep your belongings organized without taking up too much floor space.
-
Create a modular shelving system using crates or boxes to customize your storage needs and add a rustic touch to your home.
-
Consider upcycling old materials like pallets or crates to create unique and eco-friendly shelving units that reflect your personal style.
Repurposing Old Furniture Pieces
When you repurpose old furniture pieces, you'll be amazed at how they can transform your space.
You can breathe new life into outdated dressers, turn broken tables into functional storage units, and revive vintage shelves to create unique organizational solutions.
Refurbish Old Dressers
Give new life to an old dresser by transforming it into a functional storage piece that not only reduces clutter but also adds a touch of character to your home. With a little creativity and some elbow grease, you can give your old dresser a makeover that will make it a standout piece in your home.
Here are some ideas to get you started:
-
Sand and paint: Give your dresser a fresh coat of paint and sand off any rough edges to create a smooth, vintage-inspired look.
-
Update the hardware: Replace old knobs with new, stylish ones that add a touch of personality to your dresser.
-
Add decorative trim: Add some decorative trim or molding to give your dresser a unique, one-of-a-kind look.
-
Create a distressed finish: Use a distressed finish to give your dresser a worn, vintage charm that adds character to your home.
-
Add some stencils: Use stencils to add some fun designs or patterns to your dresser, giving it a creative and personalized look.
Upcycle Broken Tables
You can breathe new life into broken tables, just like you did with that old dresser, by repurposing them into functional pieces that add a touch of creativity to your home. Furniture upcycling is all about finding creative solutions to give old, discarded items a new purpose.
With a little imagination and some DIY skills, you can transform a broken table into a unique and functional piece that adds character to your space.
Consider turning an old table into a bench or a coffee table with storage. You can also repurpose the table's legs to create a one-of-a-kind shelving unit or a desk organizer.
If the table's surface is still in good condition, consider upcycling it into a headboard or a wall-mounted shelf. Broken table repurposing is a great way to reduce waste and create something truly unique.
With a few DIY projects under your belt, you'll be amazed at how easily you can breathe new life into old, discarded furniture pieces and turn them into functional works of art that reflect your personal style.
Revive Vintage Shelves
Frequently, scouring thrift stores, garage sales, or your grandparents' attics will uncover vintage shelves that, with a little TLC, can be revived into functional and stylish pieces that add a touch of nostalgia to your home. You can easily incorporate vintage decor into your space by repurposing old shelves. Not only will this give your home a unique touch, but it's also an eco-friendly way to reduce waste.
To revive vintage shelves, try these tips:
-
Sand and refinish the wood to bring out its natural beauty
-
Add new hardware to give it a modern twist
-
Paint or stain the shelves to match your home's color scheme
-
Add decorative trim or molding to give it a distressed look
-
Mix and match vintage shelves with modern decor to create a unique, eclectic style
Customizable Command Center Boards
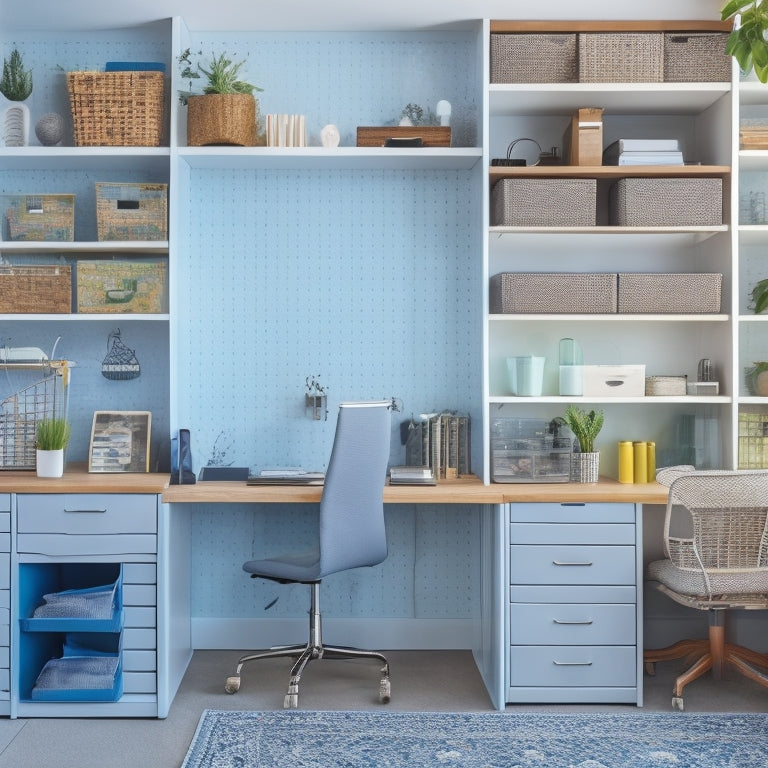
Create a centralized hub for your family's schedules, reminders, and to-do lists with a customizable command center board that adapts to your unique needs and style. This essential tool will streamline family communication, keeping everyone on the same page and reducing clutter.
You can tailor it to fit your family's specific needs, incorporating features like a calendar, chore chart, and meal planning section. With a command center board, you can plan meals in advance, keeping track of grocery lists and recipe ideas. This won't only save time but also reduce food waste and help you stick to your budget.
Additionally, you can include a section for notes and reminders, ensuring that important dates and events are never forgotten.
Utilizing Vertical Wall Space
Maximize your home's storage potential by transforming often-wasted vertical wall space into functional areas that keep clutter at bay. You can create a visually appealing and organized space by utilizing your walls wisely.
Here are some creative ways to do so:
-
Use hanging planters to bring in some greenery and add a touch of vertical gardening to your space.
-
Install wall-mounted hooks to hang items like bags, jackets, and accessories, keeping them off the floor and out of the way.
-
Add floating shelves to display decorative items, books, or kitchen utensils, keeping them within easy reach.
-
Incorporate a pegboard to hang tools, utensils, or other items, making them easily accessible.
-
Create a DIY gallery wall using frames, artwork, or photographs to add visual interest and a personal touch to your space.
Budget-Friendly Drawer Organizers
You can breathe new life into cluttered drawers by implementing budget-friendly organizers that simplify your daily routine and free up valuable space.
One effective way to do this is by exploring drawer divider options. You can use cardboard, foam, or even repurposed items like old folders or file separators to create separate compartments within your drawers. This will help you categorize and store items more efficiently, making it easier to find what you need when you need it.
If you're looking for alternative storage solutions, consider DIY drawer organizers made from affordable materials like plywood or MDF. You can create custom inserts or dividers that fit your specific needs, such as separate compartments for jewelry, utensils, or office supplies.
These budget-friendly organizing ideas can be easily adapted to fit your personal style and preferences. By implementing these simple and cost-effective solutions, you can transform your cluttered drawers into organized and functional spaces that make your daily life easier.
Creating a Home Filing System
With your newly organized drawers in place, it's time to turn your attention to establishing a home filing system that keeps your important documents in check. A well-structured filing system will help you quickly locate the documents you need, reduce clutter, and save time.
To get started, consider the following essential tools and hacks:
-
Color-coded file folders: Use different colors to categorize your files, such as personal, financial, or household documents.
-
Digital filing systems: Consider digitizing your documents using cloud-based storage services or apps, allowing you to access your files from anywhere.
-
Portable file organizers: Invest in a portable file organizer that can hold your essential documents, making it easy to take with you on-the-go.
-
Document scanning techniques: Learn how to scan your documents efficiently, using tools like document scanners or mobile apps, to reduce paper clutter.
-
Labeling and categorization: Develop a consistent labeling and categorization system to make sure your files are easy to find and understand.
Maximizing Closet Storage Capacity
Get ready to breathe new life into your closet by tackling its storage capacity, and reap the benefits of a more organized, stress-free space. To maximize your closet's storage potential, start by evaluating your needs and identifying areas for improvement.
Consider investing in shoe rack solutions to keep your footwear organized and easily accessible. Install clothing racks that allow you to double-hang items, making the most of your closet's vertical space.
Next, utilize hanging organizers to store items like bags, belts, and accessories. These can be easily installed on the back of a door or on a wall, providing additional storage without taking up valuable floor space.
Shelf dividers can also help keep folded items, like sweaters or jeans, organized and prevent them from getting jumbled. By implementing these simple solutions, you'll be able to find what you need quickly and easily, saving you time and reducing stress.
With a little creativity and some clever organizational tools, you can turn your closet into a peaceful oasis that makes your daily routine a breeze.
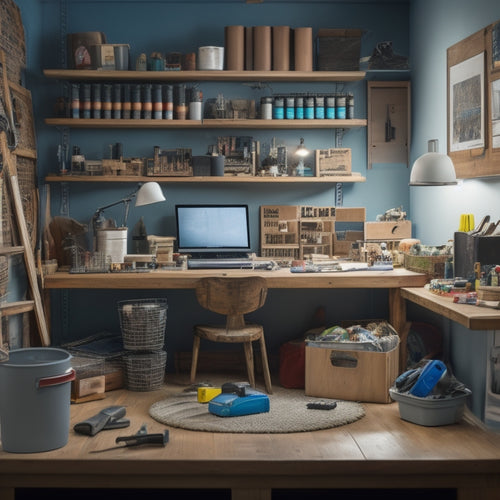
Turning a Pegboard Into Station
As you start turning a pegboard into a station, you'll need to plan carefully to maximize its potential.
You'll want to determine the essential items you'll be hanging and the space you have available, as well as decide on the best tool organization strategies for your specific needs.
Pegboard Planning Essentials
Transforming a pegboard into a functional station requires strategic planning to guarantee every tool and accessory has its designated spot, maximizing storage capacity and efficiency. You'll need to visualize your ideal pegboard layout, considering the frequency of use, size, and type of tools you'll be storing. This will help you allocate the right amount of space for each item.
To get started, gather your pegboard accessories, such as hooks, bins, and holders. Then, follow these essential planning steps:
- Measure your pegboard and tools to determine the best layout
- Group similar tools and accessories together for easy access
- Designate zones for specific tasks or projects
- Leave space for future additions or changes
- Consider a pegboard with adjustable hooks for maximum flexibility
Tool Organization Strategies
Tool Organization Strategies
By cleverly allocating pegboard real estate, you can turn your collection of tools and accessories into a tailored workstation that streamlines your workflow. This is especially important in garage organization, where tool storage can make or break your productivity.
To maximize your pegboard's potential, categorize your tools into groups, such as hand tools, power tools, and fasteners. Then, allocate specific zones on the pegboard for each group. This will help you quickly locate the tool you need, reducing downtime and increasing efficiency.
Here's a sample layout to get you started:
| Tool Category | Pegboard Zone | Tool Examples |
|---|---|---|
| Hand Tools | Top Left | Hammer, Tape Measure, Level |
| Power Tools | Top Right | Drill, Impact Driver, Circular Saw |
| Fasteners | Bottom Left | Nails, Screws, Bolts |
| Accessories | Bottom Right | Tool belts, Pouches, Safety Goggles |
Custom Station Setup
You can further optimize your pegboard by designing a custom station that streamlines your workflow and reduces clutter. This setup allows you to create a personalized workspace that suits your specific needs and preferences. By tailoring your station to your workflow, you can increase productivity and efficiency.
Here are some ideas to get you started:
-
Create a custom desk with built-in storage for frequently used tools and supplies
-
Designate specific zones for different tasks or projects to keep related items organized
-
Incorporate a pegboard with hooks and bins to hang and store items within easy reach
-
Add a countertop or work surface with built-in organizers, such as trays or drawers, to keep small items organized
-
Consider adding a small shelving unit or cart to store less frequently used items or supplies
Frequently Asked Questions
What Are Some Eco-Friendly Alternatives to Traditional Storage Bins?
When looking for eco-friendly storage options, you'll find sustainable solutions in upcycled containers like old wooden crates, mason jars, or repurposed cardboard boxes, reducing waste and promoting a greener way to organize your space.
Can I Use a Label Maker on Non-Porous Surfaces Like Glass?
You're wondering if you can use a label maker on non-porous surfaces like glass. Yes, you can, but make sure the label maker has a suitable adhesive for glass or metal, and test it first to avoid any organization mishaps.
How Do I Prevent DIY Shelving Units From Looking Cluttered?
When designing your DIY shelving units, you'll want to avoid clutter by opting for minimalist shelving and incorporating hidden storage solutions, like baskets or drawers, to keep items out of sight and maintain a clean aesthetic.
Are There Any Special Considerations for Organizing a Home Office?
'Think of your home office as a well-oiled machine: you're the engineer, and filing systems, desk organization, cable management, and ergonomic setup are the essential components that keep it running smoothly, allowing you to stay focused and productive.'
Can I Use Command Center Boards in a Rental Property?
When renting, you'll want temporary solutions that won't damage walls. Consider using command center boards with removable adhesive strips or asking your landlord for approval to install a more permanent command center solution.
Related Posts
-
What Makes Effective Online DIY Home Organization Courses?
You're about to reveal the secrets to transforming your living space into a serene and functional oasis, and it all b...
-

Bathroom Storage Hacks for Small Spaces Revealed
You're about to discover the ultimate bathroom storage hacks for your small space! Start by maximizing your vertical ...

