
10 Online Tutorials to Organize Your Playroom
You're about to transform your chaotic playroom into a haven of creativity and calm. Start by decluttering and sorting toys and supplies, then create a DIY storage solution that's both functional and visually appealing. Set up a craft station that inspires creativity, and don't forget to label and categorize toys to encourage kids to put them back. Repurpose old furniture into unique storage units, and utilize vertical space to maximize storage. With these expert-led online tutorials, you'll be designing a functional playroom that sparks imagination and joy in no time - and that's just the beginning of your playroom's transformation.
Key Takeaways
• Utilize a toy rotation system to keep kids engaged and reduce clutter by regularly switching out available toys.
• Implement DIY storage solutions like modular shelving, color-coded bins, and hanging organizers to maximize space.
• Categorize and label toys and supplies to encourage kids to put things back in their designated places.
• Create functional spaces like reading nooks and craft stations to promote imagination and creativity.
• Teach kids the importance of organization and involve them in the process to instill good habits and a sense of responsibility.
Decluttering Toys and Supplies
Start by gathering all the toys and supplies from the playroom floor and sorting them into categories, like building blocks, art supplies, and puzzles, to get a sense of what you're working with. This will help you identify what you have, what's broken, and what's no longer needed.
Consider implementing a toy rotation system, where you switch out toys every few months to keep things fresh and interesting for your kids. You can also organize toys by age or theme to make it easier for your kids to find what they're looking for.
As you sort, set aside items that are still in good condition but no longer needed. Consider hosting a donation drive or passing them along to a local charity. This not only declutters your playroom but also teaches your kids the value of giving back.
When it comes to the playroom layout, think about how you can create zones for different activities, like a building area, an art station, and a reading nook. By organizing your toys and supplies, you'll create a more peaceful and functional space that encourages creativity and learning.
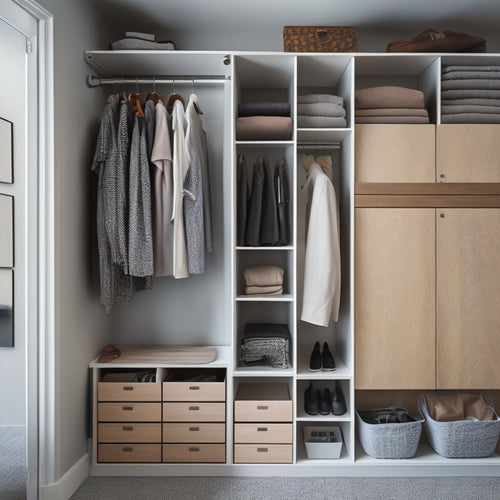
DIY Shelves for Storage
Now that you've purged your playroom of unwanted items, it's time to think about storage solutions.
You'll need to plan your shelf space strategically to maximize storage and make the most of your room's layout.
Shelf Space Planning
You'll need to maximize your shelf space to keep toys, books, and games organized and easily accessible in your playroom. This is where shelf space planning comes in.
To make the most of your DIY shelves, consider the following strategies:
-
Color coding: organize toys and games by category or age group using colored bins or labels, making it easy for kids to find what they're looking for.
-
Toy rotation: rotate toys every few months to keep things fresh and interesting, and to encourage kids to play with different toys.
-
Modular shelving: use modular shelving units that can be easily rearranged or added to as your playroom needs change.
- Toy display: create a visually appealing display of favorite toys or books, encouraging kids to engage with them and making the playroom feel more inviting.
Easy Installation Tips
With your shelf space plan in place, it's time to bring your DIY shelves to life by following these easy installation tips. Remember to gather all the necessary tools and materials before you start. This will save you time and frustration in the long run.
Installation Tips
| Task | Tips |
|---|---|
| Assembling shelves | Follow the manufacturer's instructions, and consider enlisting a friend's help if needed. |
| Hanging shelves | Use a level to guarantee shelves are straight, and install wall anchors for extra support. |
| Organizing tools | Designate a specific area for tool organization, and use bins and baskets to keep items off the floor. |
| Adding hanging storage | Install hooks or bins for hanging storage, such as baskets for toys or bags for costumes. |
When it comes to tool organization, think about how you can optimize your space. Consider investing in a pegboard or a tool chest to keep items within easy reach. For hanging storage, think about what you need to store and how you can best utilize your wall space. With these tips, you'll be well on your way to creating a functional and organized playroom.
Creating a Craft Station
Now that you've got your DIY shelves in place, it's time to think about the fun part - creating a craft station where your little ones can let their creativity shine!
You'll want to set up a system for storing craft supplies within easy reach, and designate specific work areas for different activities.
Craft Supply Storage
Organizing your craft supplies into a dedicated station helps contain the chaos and inspires creativity in your playroom. A well-organized craft station encourages you to explore your artistic side and makes it easier to find what you need when you need it.
To create an efficient craft supply storage system, consider the following ideas:
-
Color code your supplies: Group similar items together, such as paints, markers, or colored pencils, and store them in labeled bins or baskets.
-
Use DIY storage solutions: Repurpose items like mason jars, wooden crates, or cardboard boxes to store craft supplies, keeping them visible and accessible.
-
Designate a specific area for frequently used items: Keep your most-used supplies within easy reach to save time and reduce clutter.
- Label and categorize your supplies: Use labels and categories to keep similar items together, making it easier to find what you need quickly.
Designated Work Areas
You'll enhance productivity and creativity by setting up designated work areas, like a craft station, where kids can focus on their projects without interruptions or distractions. A well-designed craft station encourages kids to explore their creativity, develop problem-solving skills, and build confidence.
To create an effective craft station, consider the following layout and storage solutions:
| Zone | Components | Tips |
|---|---|---|
| Workspace | Desk or table, chair, good lighting | Ensure ample space for kids to move around comfortably |
| Supply Storage | Shelves, bins, baskets, labels | Organize supplies by category, and label each bin for easy access |
| Inspiration Area | Bulletin board, art displays, motivational quotes | Encourage kids to display their work, and provide inspiration from other artists |
| Tool Station | Pencil holders, scissors, glue, tape | Keep frequently used tools within easy reach |
| Clean-up Zone | Trash can, recycling bin, cleaning supplies | Teach kids the importance of cleaning up as they go |
Labeling and Categorizing Toys
By categorizing toys into groups like blocks, dolls, and art supplies, you're creating a system that makes it easy for kids to find what they need and put things back in their place. This is especially important when it comes to toy rotation, where you're regularly switching out toys to keep things fresh and exciting. By labeling each category, you're teaching your kids the importance of toy organization and making clean-up a breeze.
Here are some tips to help you categorize and label your toys effectively:
-
Group similar toys together: This makes it easy for kids to find what they're looking for and prevents toys from getting scattered all over the room.
-
Use clear and concise labels: Avoid using vague labels like 'toys' or 'stuff'. Instead, opt for specific labels like 'cars' or 'dress-up clothes'.
-
Teach kids to put things back: Encourage kids to put toys back in their designated category after playtime. This helps maintain the organization system and teaches responsibility.
- Consider a 'donate' box: Designate a box or bin for toys that are outgrown or no longer used. This makes it easy to identify toys that can be donated or recycled.
Repurposing Old Furniture
Give old furniture a new lease on life by repurposing it into functional storage units that'll keep your playroom tidy and your kids excited to clean up. You can breathe new life into old pieces by giving them a fresh coat of paint, replacing hardware, or adding decorative stickers. Get creative and think outside the box (or furniture piece!) to come up with unique storage solutions.
Here are some ideas to get you started:
| Furniture Makeover | Creative Storage Solution |
|---|---|
| Old dresser | Toy station with labeled drawers |
| Vintage bookshelf | Display case for favorite toys and books |
| Unused coffee table | Sensory bin storage with removable bins |
Building a Playroom Shelf
Create a customized playroom shelf that doubles as a display case for your child's favorite toys and a storage unit for toys and supplies, all while adding a touch of personal style to the room. You'll be amazed at how a well-designed shelf can transform the space.
To get started, consider the following essential elements:
-
Determine the shelf's purpose: Will it primarily display toys or store supplies? This will help you decide on the shelving materials and design.
-
Choose a paint color: Select a color that complements the room's décor and adds a pop of personality.
-
Select shelving materials: Opt for sturdy materials like wood or metal that can hold the weight of toys and supplies.
- Plan for adjustable shelves: Incorporate adjustable shelves to accommodate toys and supplies of varying sizes.
Organizing Art Supplies
Now that you've built a playroom shelf, it's time to focus on organizing the art supplies that will go on it.
You'll want to start by categorizing your supplies, such as paints, markers, and paper, to make them easy to find and use.
Art Supply Categories
You'll find it's much easier to maintain a tidy playroom when you categorize art supplies into distinct groups. This approach helps you locate specific materials quickly and prevents clutter from building up.
To get started, sort your art supplies into the following categories:
-
Painting supplies: paints, brushes, palettes, and canvases
-
Drawing tools: pencils, markers, crayons, and sketchbooks
-
Crafting essentials: glue, scissors, tape, and paper rolls
- Miscellaneous: color coded containers, creative art displays, and crafting stationery essentials
Storage Bin Labels
With your art supplies categorized, assign a home for each group by labeling storage bins, making it easy to identify where items belong and promoting a sense of responsibility among kids to put things back in their place. This step is essential in maintaining the organization you've worked so hard to achieve.
You can use color-coded labels to differentiate between categories, such as paints, markers, and paper. This visual cue will help kids quickly identify where an item belongs.
To take it a step further, consider creating personalized tags with your child's name or a fun design. This won't only make the labels more engaging but also give your child a sense of ownership and accountability. You can use a label maker or create your own labels using cardstock and markers.
Be sure to involve your child in the process of creating the labels, as this will help them understand the system and be more likely to follow it. With labeled storage bins, you'll be amazed at how easily your child can find what they need and how quickly they'll develop the habit of putting things back in their place.
Utilizing Vertical Space
By installing shelves, hooks, or storage units that go up to the ceiling, you can maximize the often-wasted vertical space in your playroom and keep clutter at bay. This is especially important in playrooms, where floor space is often limited. By utilizing vertical space, you can create a sense of openness and make the room feel more spacious.
Here are some ideas to get you started:
-
Hanging baskets: Suspend them from the ceiling to store soft toys, craft supplies, or dress-up clothes.
-
Wall hooks: Use them to hang items like bikes, scooters, or backpacks, keeping them off the floor and out of the way.
-
Floating shelves: Install them to display books, decorative items, or board games, keeping them organized and easily accessible.
- Hanging organizers: Utilize them to store items like puzzles, playdough, or art supplies, keeping them tidy and within reach.
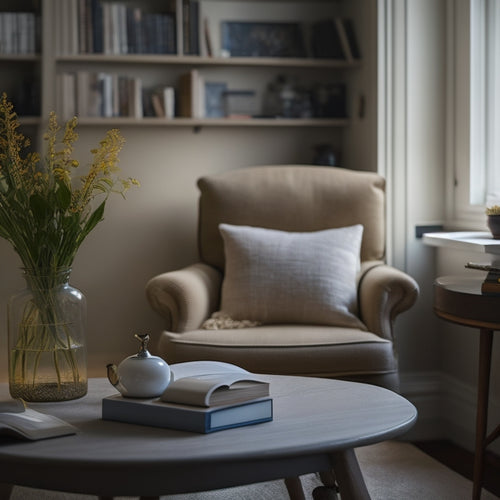
Designing a Reading Nook
Six cozy elements can come together to create a reading nook in your playroom that beckons kids to curl up with a good book.
You'll want to start with a comfortable seating area, like a plush armchair or a DIY floor cushion. Add some soft lighting, such as a table lamp or a string of fairy lights, to create a warm and inviting atmosphere.
Next, incorporate some themed bookshelves that match your child's interests, like a bookcase shaped like a castle or a bookshelf with a jungle theme. A wall-mounted book display can also add visual appeal and make it easy for kids to find their favorite books.
To complete the cozy reading corner, add some cozy textiles like throw blankets, pillows, and a rug. Finally, consider adding some decorative elements, such as a fun reading-themed wall art or a few favorite stuffed animals, to make the space feel truly special.
Maximizing Corner Storage
Corners, often the most underutilized spaces in a playroom, can be transformed into valuable storage areas that keep toys and clutter at bay. By utilizing creative storage solutions, you can turn these neglected areas into functional spaces that promote organization and tidiness.
Here are some ideas to get you started:
-
Use storage basket ideas like woven baskets or fabric bins to store toys, books, and puzzles, keeping them out of sight but still accessible.
-
Install unique wall shelving that fits snugly into the corner, providing a perfect spot for displaying favorite toys or decorative items.
-
Invest in creative toy bins that can be mounted to the wall or placed on the floor, making it easy for kids to put away their toys.
- Consider a rotating storage unit that can be placed in the corner, allowing kids to easily access toys and games while keeping the floor clear.
Frequently Asked Questions
How Do I Involve My Kids in the Organization Process?
Did you know 75% of kids learn better through hands-on activities? You involve your kids in the organization process by making it fun! Let them create their own storage labels, design a toy categorization system, and come up with creative solutions together.
What Is the Ideal Age to Start Teaching Organization Skills?
You can start teaching organization skills in early childhood, as it's crucial to introduce them during critical developmental stages. Around 2-3 years old, you can begin with simple tasks, gradually increasing complexity as they grow.
Can I Repurpose Old Storage Bins From Other Rooms?
You can breathe new life into old storage bins from other rooms by repurposing them as creative storage solutions, and exploring storage bin alternatives, like wicker baskets or decorative crates, for a unique upcycled look.
How Often Should I Maintain and Update the Playroom Organization?
"When in Rome, do as the Romans do" - establish a maintenance schedule to keep your playroom tidy. Set aside time weekly to maintain order, and monthly to update your system, ensuring consistency and reaping benefits like reduced stress and increased productivity.
Are There Any Organization Methods That Work for Kids With Adhd?
You'll find that ADHD strategies, like a clutter-free playroom layout, help kids focus. Incorporate sensory-friendly storage solutions, and ADHD accommodations, such as labeled bins and visual schedules, to create a space that works for them.
Related Posts
-
7 Best Compact Closet Storage Ideas for Tiny Homes
You're looking for compact closet storage ideas to maximize your tiny home's space. Start by doubling your hanging sp...
-
Simplify Your Space: Downsizing Tips for Seniors
You're ready to simplify your space and create a more peaceful living environment. Start by gathering boxes, bins, an...

