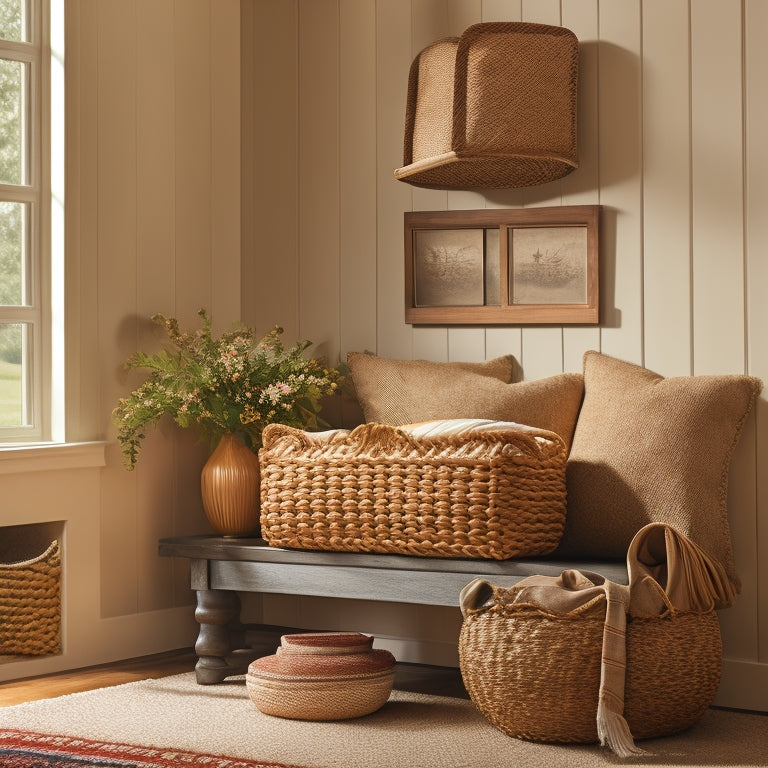
Build a DIY Storage Bench for Your Entryway
You'll start by selecting the right lumber for your DIY storage bench, considering factors like weight capacity, wood quality, and rot resistance. Next, measure and cut the frame pieces accurately, using a tape measure and square, and assemble them securely with wood screws. Add a sturdy storage compartment and a comfortable seat and backrest, then attach the legs and feet for a stable base. Finally, add decorative trim and molding, sand, and stain the bench to match your entryway's style. Now, get ready to add the finishing touches that'll make your bench a cozy, functional masterpiece.
Key Takeaways
• Choose high-quality lumber, such as cedar, pine, or spruce, to ensure durability and rot resistance in your DIY storage bench.
• Measure and cut frame pieces accurately using a tape measure, square, and miter saw to ensure a sturdy and square frame.
• Assemble the frame securely with wood screws, ensuring corners are square and edges align perfectly, and use clamps to hold pieces together.
• Add a storage compartment with a sturdy frame, shelf, and hinges, and consider paint and upholstery options to match your entryway style.
• Sand and stain the bench to remove imperfections and complement the entryway's aesthetic, and add decorative trim and molding for a finished look.
Choose the Right Lumber
Select 2x4s or 2x6s for the frame, depending on the size and sturdiness you need for your DIY storage bench. You'll want to choose lumber that can support the weight of the bench and its intended use. Consider the load capacity and the overall aesthetic you're aiming for. For a smaller bench, 2x4s might be sufficient, while a larger or heavier bench may require 2x6s.
When it comes to lumber selection, wood quality is vital. Look for straight, knot-free boards with minimal warping or twisting. Avoid boards with cracks, splits, or signs of decay. You'll also want to choose the right type of wood for your project. Cedar, pine, and spruce are popular choices for outdoor or entryway projects, as they're naturally resistant to rot and insect damage.
Take the time to inspect each board carefully, and don't be afraid to reject any that don't meet your standards. Remember, the quality of your lumber will directly impact the strength and durability of your finished bench.
Measure and Cut the Frame
With your high-quality lumber in hand, start by measuring and marking the cuts for the frame, using a tape measure and square to ensure accuracy and precision. Take your time to confirm the measurements align with your frame design. For a sturdy bench, you'll need four legs, two side panels, and two armrests.
Measure and mark the lumber accordingly, taking into account the thickness of the wood and the desired dimensions of your bench. When marking the cuts, use a pencil to create a clear line, and make sure to consider any mitered corners or angled cuts. For a clean cut, use a combination of cutting techniques, such as a miter saw for precise angled cuts and a circular saw for straight cuts.
Always cut outside the marked line, leaving room for sanding and adjustments. As you cut each piece, organize them according to your frame design, confirming everything is in order before moving on to the next step. Remember to wear protective gear, including safety glasses and gloves, to prevent accidents.
Assemble the Frame Pieces
Now that you've cut all the frame pieces, it's time to start assembling them.
Begin by laying out the legs, side rails, and armrest supports on a flat surface, ensuring they're aligned and spaced evenly.
Next, you'll use screws to attach the side rails to the legs, creating the base of your storage bench's frame.
Frame Construction Basics
Take the four frame pieces you've cut to size and lay them out on a flat surface, making sure the corners are square and the edges align perfectly. This is essential for frame stability, as any misalignment can compromise the entire structure.
Next, identify the top and bottom pieces, and the left and right sides. Use clamps to hold the pieces together, ensuring they're flush and even.
Now, use 2.5-inch wood screws to secure the frame pieces together. Start with the sides, attaching them to the top and bottom pieces. Make sure to screw into the studs, not just the surface, to guarantee maximum weight capacity.
As you assemble the frame, check frequently to make sure it remains square and level. If necessary, make adjustments as you go.
Cutting the Frame Pieces
You'll need to precisely cut four frame pieces to the correct size using a miter saw or a circular saw, ensuring precise 45-degree angles and accurate length measurements. This will guarantee a sturdy and balanced frame assembly. Take your time, and double-check your measurements to avoid errors. Cut two pieces for the sides and two for the top and bottom. Sand the cut edges to smooth out any rough spots.
Once you've cut all the frame pieces, lay them out to verify everything fits together seamlessly. Make any necessary adjustments before moving on to the frame assembly. Remember, a well-built frame is the foundation of a sturdy storage bench.
As you assemble the frame, think about the finishing touches you'll add later, such as paint options and cushion ideas. Consider the style and color scheme you want to achieve, and plan accordingly. With a solid frame in place, you'll be ready to add the final details that will make your DIY storage bench truly shine.
Add the Seat and Backrest
Fasten the seat slats to the frame, spacing them evenly apart to create a robust surface that will uphold the weight of anyone sitting on the bench. Make certain the slats are level and securely attached to guarantee a pleasant seating experience.
Next, focus on the backrest design. You can select from various upholstery options to match your entryway's style, from sleek and modern to traditional and ornate. Consider the overall aesthetic you want to achieve and choose a backrest design that complements it.
Once you've chosen the backrest design, affix it to the frame, ensuring it's sturdy and secure. Add a seat cushion to provide additional comfort and support. You can opt for a cushion with a soft, plush material or a more firm, supportive one, depending on your personal preference. The key is to create a cozy seating area that encourages relaxation and conversation.
With the seat and backrest in place, your DIY storage bench is starting to take shape.
Install the Storage Compartment
Now it's time to create the storage compartment that'll keep your entryway clutter-free.
You'll start by assembling the storage box frame, making sure it's sturdy and even.
Next, you'll attach the back panel securely, then add a shelf and hinges to complete the compartment.
Assemble Storage Box Frame
By the time you've gathered all the necessary materials, you're ready to start building the storage box frame, which will serve as the foundation for your entryway storage compartment. Begin by assembling the four sides of the frame using wood screws and a drill. Make sure the corners are secure and the frame is level.
Next, attach the bottom panel to the frame using wood glue and nails. This will provide a solid base for your storage compartment.
Now, think about the aesthetic you want to achieve. Consider your paint options and choose a color that complements your entryway's décor. You may also want to add some upholstery ideas to give your storage bench a cozy touch.
Once you've assembled the frame, you can start thinking about the finishing touches. Sand the entire frame to smooth out any rough edges and apply your chosen paint or stain. Allow it to dry before moving on to the next step.
With your storage box frame assembled and looking great, you're one step closer to having a functional and stylish entryway storage bench.
Attach Back Panel Securely
With your storage box frame assembled and looking great, you're ready to move on to the next step: securing the back panel to create a fully enclosed storage compartment.
This is where your design skills come into play, as you'll need to make sure the back panel design is both functional and aesthetically pleasing.
To achieve this, follow these key steps:
-
Measure and cut the back panel: Verify it fits snugly against the frame, with no gaps or overlaps.
-
Reinforce the back panel: Add extra support using wood glue, screws, or nails to prevent warping or sagging.
-
Choose the right anchoring technique: Decide on the best method to secure the back panel to the frame, such as using hinges, screws, or brackets.
- Test for stability: Gently push and pull the back panel to make sure it's securely attached and won't come loose over time.
Add Shelf and Hinges
You're ready to transform your storage box frame into a functional storage compartment by adding a shelf and hinges that will enable easy access to the interior. Begin by attaching the shelf to the frame using screws or nails, ensuring it's level and secure.
Next, attach the hinges to the lid and frame, making sure they're aligned properly. This will allow the lid to open and close smoothly.
Consider adding a decorative trim or molding to the shelf and lid to give your storage bench a polished look. You can also use paint techniques such as distressing or stenciling to add visual interest.
Upholstery options like a cushioned top or decorative fabric can further enhance the aesthetic appeal of your storage bench.
Once the shelf and hinges are installed, you can start thinking about the finishing touches. Add a coat of paint or stain to match your entryway's décor, and attach any hardware or knobs to the lid.
With these final details in place, your DIY storage bench will be ready to provide functional storage and a stylish touch to your entryway.
Add a Cushion or Upholstery
Measure your bench's seat and backrest to determine the size of cushion or upholstery you'll need, taking into account any curves or irregular shapes that may require custom fitting. This will secure a snug and comfortable fit.
When selecting your fabric or upholstery material, consider the following factors to create a cohesive look:
-
Fabric selection: Choose a durable, stain-resistant fabric that complements your entryway's color scheme and style.
-
Cushion thickness: Decide on a cushion thickness that provides the right amount of comfort and support for your needs.
-
Color coordination: Guarantee the fabric or upholstery material matches or harmonizes with the surrounding decor and colors.
- Upholstery material: Consider the durability and maintenance requirements of the material, such as velvet, linen, or faux leather.
Remember to factor in any additional features you may want, like piping or tufting, to give your bench a polished finish. By carefully selecting your cushion or upholstery, you'll create a beautiful and functional piece that enhances your entryway's style and functionality.
Attach the Legs and Feet
Your DIY storage bench is taking shape, and now it's time to add the legs and feet that will elevate it off the floor and create a sturdy base.
When choosing the legs, prioritize leg stability to secure your bench doesn't wobble or tip over. You can opt for metal or wooden legs, depending on the style and material of your bench. For a more rustic look, consider wooden legs with a natural finish. If you prefer a sleek, modern design, metal legs in a chrome or silver finish might be the way to go.
When it comes to foot design, think about the type of floor your bench will sit on. If it's a hardwood or tile floor, you'll want to add felt pads to the feet to prevent scratching. For carpeted floors, you can opt for feet with a non-slip grip.
Assembly techniques will vary depending on the type of legs and feet you choose. Some may require screws or bolts, while others might use a simple snap-on design. Make sure to follow the manufacturer's instructions for a secure and stable attachment.
Add Decorative Trim and Molding
With the structural components of your storage bench in place, it's time to focus on adding the finishing touches, starting with decorative trim and molding that will elevate its style and sophistication.
To add a touch of elegance, consider incorporating the following design elements:
-
Crown molding: adds a regal touch to the top of your bench
-
Dental molding: creates a subtle, textured look along the edges
-
Wainscoting trim: adds a decorative accent to the sides or back of the bench
- Rosette trim: creates a beautiful, ornate pattern on the corners or edges
When choosing your trim and molding, think about the overall aesthetic you want to achieve. Will you opt for a bold, contrasting color or a more subtle, matching tone? Consider your paint techniques, too - will you go for a distressed look or a smooth, glossy finish?
Don't forget to think about your upholstery options and color choices, as these will also impact the overall look and feel of your bench. By carefully selecting your trim and molding, you'll create a beautiful, cohesive design that enhances your entryway's style and functionality.
Sand and Stain the Bench
Now it's time to bring out the beauty of your DIY storage bench by sanding and staining it.
You'll need to prepare the surface by sanding it smooth, making sure to remove any imperfections or rough spots.
Next, you'll apply the stain, carefully following the manufacturer's instructions to achieve the perfect color and finish.
Sand Preparation Tips
Gather your sandpaper arsenal, including coarse 80-grit, medium 120-grit, and fine 220-grit sheets, to tackle the sanding process, which will leave your bench's surface smooth and ready for staining.
The key to a successful sanding job is to work progressively through the grits, starting with the coarsest and moving to the finest.
Here's a step-by-step guide to help you visualize the process:
-
Remove imperfections: Use 80-grit sandpaper to remove any imperfections, such as scratches or dents, from the wood surface.
-
Smooth out the surface: Switch to 120-grit sandpaper to smooth out the surface, removing any remaining scratches or marks.
-
Refine the finish: Use 220-grit sandpaper to refine the finish, leaving the wood surface smooth and even.
- Inspect and repeat: Inspect the surface for any remaining imperfections and repeat the process as needed.
Staining the Wood
Sand-free and smooth, your bench's surface is prepared for staining, and you're eager to bring out the wood's natural beauty. Now, it's time to select the perfect stain that complements your entryway's style. Consider the type of wood, the color scheme, and the level of gloss you prefer.
| Staining Options | Characteristics |
|---|---|
| Oil-based stain | Provides a rich, glossy finish and is long-lasting |
| Water-based stain | Simple to clean up, dries quickly, and has minimal odor |
| Gel stain | Dense, easy to apply, and ideal for vertical surfaces |
| Stain with polyurethane | Merges color and protection in one step |
| Whitewash stain | Produces a distressed, vintage appearance |
When applying the stain, remember to work in small sections, using a clean cloth or foam brush. Always follow the manufacturer's instructions and perform a test patch before applying the stain to the entire bench. This guarantees you achieve the desired color and finish. By selecting the right stain and applying it correctly, you'll enhance the beauty of your DIY storage bench and create a striking focal point in your entryway.
Add Hardware and Accessories
Attach the hinges to the lid of your storage bench, making sure they're evenly spaced and aligned with the edges of the seat. This will secure a smooth opening and closing of the lid.
Next, contemplate the handle options for your storage bench. You can choose from a variety of styles, such as rustic metal handles or modern wooden knobs. Select handles that complement the overall aesthetic of your entryway and the paint selection you chose earlier.
Here are some additional hardware and accessories you may want to ponder:
-
Soft-close hinges: These will prevent the lid from slamming shut and reduce wear and tear on the hinges.
-
Decorative screws: Use these to add a touch of elegance to the exterior of your storage bench.
-
Storage baskets: Place these inside the bench to keep items organized and within reach.
- Furniture glides: Attach these to the legs of your storage bench to protect your floor from scratches and scuffs.
Frequently Asked Questions
Can I Use MDF or Plywood Instead of Solid Wood?
You can opt for MDF or plywood over solid wood, but consider durability and cost; MDF is cheaper, while plywood is more durable, and both can be painted with techniques like priming and sanding to achieve a smooth finish.
How Do I Add a Backrest With a Curved Design?
"Imagine a sweeping curve like the Guggenheim Museum's iconic spiral ramp. To achieve a curved backrest, you'll consider options like bent plywood, kerfing, or steam-bending; carefully plan your design, taking into account ergonomics and support."
What's the Best Way to Attach the Storage Compartment Lid?
When attaching the storage compartment lid, you'll want to choose the right hinge selection to guarantee smooth opening and closing. Don't forget to add lid support for extra stability, and prioritize safety precautions to secure a weight capacity that can hold what you need.
Can I Add Casters for a Mobile Storage Bench?
You can add casters for a mobile storage bench, choosing from soft-wheel, locking, or heavy-duty options. Guarantee bench stability by considering weight distribution, caster placement, and a sturdy design to maintain mobility without compromising functionality.
How Do I Add Electrical Outlets or USB Ports to the Bench?
You'll need to carefully plan and execute the installation of outlets and USB ports, considering wiring routes, safety precautions, and load capacities to guarantee safe and functional power access in your mobile storage bench.
Related Posts
-
7 Best Compact Closet Storage Ideas for Tiny Homes
You're looking for compact closet storage ideas to maximize your tiny home's space. Start by doubling your hanging sp...
-
7 Clever Hacks for Small Bedroom Storage
You're about to discover the secret to revealing generous storage in even the smallest of bedrooms. Start by maximizi...
-

Bathroom Storage Hacks for Small Spaces Revealed
You're about to discover the ultimate bathroom storage hacks for your small space! Start by maximizing your vertical ...


