Craft Your Own Stylish Wall Jewelry Organizer
I'm excited to share a stylish solution to my jewelry collection chaos by creating a custom wall jewelry organizer that's both functional and fashionable. To get started, I'll need a trusty saw, sandpaper, paint or stain, a paintbrush, and glue or nails. First, I'll lightly sand the edges of my wood plank, then measure and draw a pattern on the board. Next, I'll paint the shapes with acrylic paint in my chosen colors and cut dowels to different sizes. As I add the finishing touches, I'll spray paint all metallic parts with gold for a touch of luxury. Now, let's get creative and see how this stylish organizer comes together!
Key Takeaways
• Gather essential tools and materials, including a saw, sandpaper, paint, and glue, to craft a stylish wall jewelry organizer.
• Design your organizer with bold geometric shapes, mixing metallic and wooden accents, and choose a sleek color scheme like white, gold, and copper.
• Measure and draw a pattern on the wood plank, then paint and cut dowels to create a functional and stylish jewelry storage space.
• Consider hanging options like screws or nails, and optimize your design to maximize wall real estate and reduce clutter.
• Customize your organizer by adding more dowels or using different paint colors to match your room's aesthetic and create a unique piece of home decor.
Essential Tools and Materials
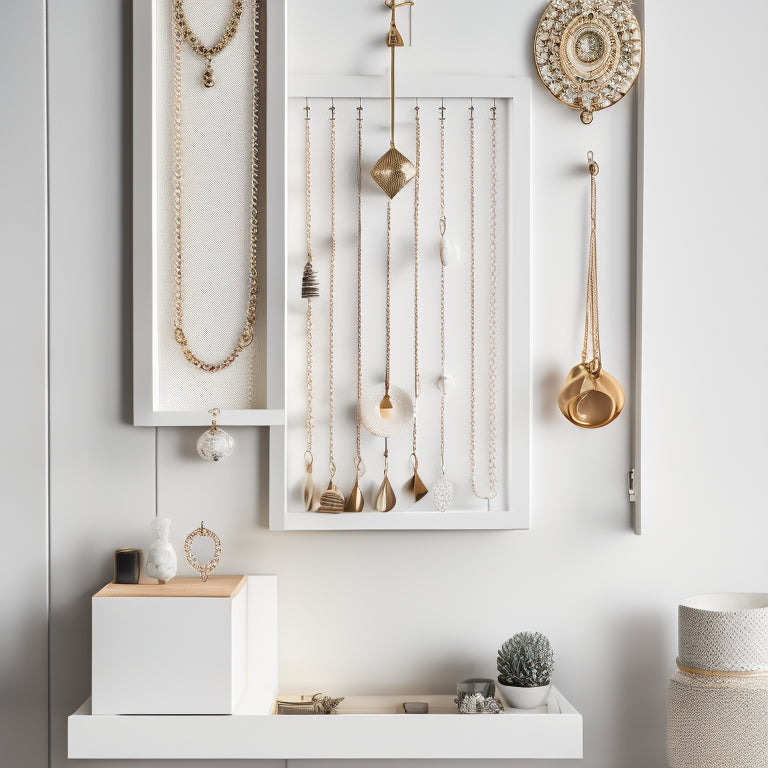
I'm gathering my arsenal of essential tools and materials, including a trusty saw, sandpaper, paint or stain, a paintbrush, and glue or nails, to bring my DIY geometric wall jewelry organizer to life.
When it comes to tool selection, I'm opting for a reliable saw that can make precise cuts and sandpaper that'll smooth out any rough edges. For material options, I've chosen a sturdy wood plank that'll provide a solid base for my design.
Speaking of design ideas, I'm thinking bold and modern with geometric shapes and a mix of metallic and wooden accents. Color choices are important, and I'm leaning towards a sleek white, gold, and copper combo that'll add a touch of sophistication to any room.
With these essentials in place, I'm ready to get creative and make this jewelry organizer a reality!
Step-by-Step Assembly Guide
With my materials and tools ready, I'll start assembling the DIY geometric wall jewelry organizer by lightly sanding the edges of the wood plank to smooth out any rough spots.
Next, I'll measure and draw the pattern on the board, and then paint the shapes with acrylic paint in my chosen colors - I'm feeling bold with a mix of white, gold, and copper!
After that, I'll cut the dowels to different sizes and spray paint all the metallic parts with gold paint for a cohesive look.
For customization ideas, I can add more dowels or use different paint color suggestions to match my room's aesthetic.
When it comes to hanging options, I can opt for screws or nails, keeping in mind space saving tips to maximize my wall's real estate.
Benefits of a Wall Organizer
Having a wall jewelry organizer keeps my accessories neatly organized, preventing the frustrating tangles that come with storing them in a cluttered jewelry box.
I no longer waste time searching for that perfect necklace or earrings - everything is right at my fingertips! With this stylish organizer, I've gained valuable space in my closet, and my morning routine is now a breeze. Plus, it adds a touch of modern chic to my room.
By keeping my jewelry organized, I've reduced clutter and chaos, making it easier to get ready in the morning. And let's be real, who doesn't love a good space-saving tip?
This wall organizer is a game-changer, providing organization benefits that make my life easier and more stylish.
Frequently Asked Questions
Can I Use a Different Type of Wood for the Plank?
The age-old question: can I get creative with my wood choice? Absolutely!
I say, why stick to the usual 7 x 1 x 19 wood plank when you can experiment with different wood grain options? From rich walnut to rustic oak, the possibilities are endless.
And, let's not forget about plank thickness variations - go for a sleek 1/2 inch or a sturdy 3/4 inch, depending on your personal style.
Just remember, the key is to have fun and make it your own!
How Do I Prevent the Paint From Chipping off Easily?
The pesky paint chipping conundrum! I've been there, done that, and got the flaky souvenir. To guarantee this fashion faux pas, I swear by a good Paint Primer. It's like a BFF for your wood, creating a smooth surface for the paint to cling to.
Don't skip Surface Prep, either - a light sanding and dusting will secure a strong bond between the primer and paint. Trust me, it's worth the extra effort for a chip-resistant finish that'll make your DIY jewelry organizer a true showstopper!
Are There Alternative Materials for the Plumbing Floor Flanges?
I'm on the hunt for alternatives to those plumbing floor flanges! I've got my eyes on some copper alternatives that'll give my jewelry organizer a sleek vibe.
But, let's get eco-friendly too! I'm exploring recycled materials that'll reduce waste and add some green cred to my DIY project.
Think repurposed metal washers or vintage brooches - the possibilities are endless!
Who says functional can't be fashionable and sustainable?
Can I Add More Than One Row of Dowels for Extra Storage?
The eternal quest for more storage - I'm guilty of it too!
Can I add more than one row of dowels for extra storage, you ask? Absolutely, but don't say I didn't warn you: it's a slippery slope. Before you know it, you'll be adding dowel upon dowel, creating a multi-tiered design that's more jewelry skyscraper than organizer.
Just be mindful of dowel spacing, and you'll be stacking necklaces like a pro!
Is It Possible to Attach the Organizer to a Closet Door Instead?
The ultimate space-saver's dilemma: can I attach my new favorite jewelry organizer to a closet door instead of a wall? Absolutely, I can!
I'll just need to swap out the wall-mounting hardware for over-the-door hooks or a door-mounted bracket.
This way, I can maximize my closet door's real estate and keep my jewelry collection tidy and within reach.
Genius, right?
Related Posts
-
Why Cluttered Bedrooms Are a Thing of the Past
You've finally said goodbye to cluttered bedrooms, thanks to innovative storage solutions that have revolutionized th...
-
7 Best Compact Closet Storage Ideas for Tiny Homes
You're looking for compact closet storage ideas to maximize your tiny home's space. Start by doubling your hanging sp...

