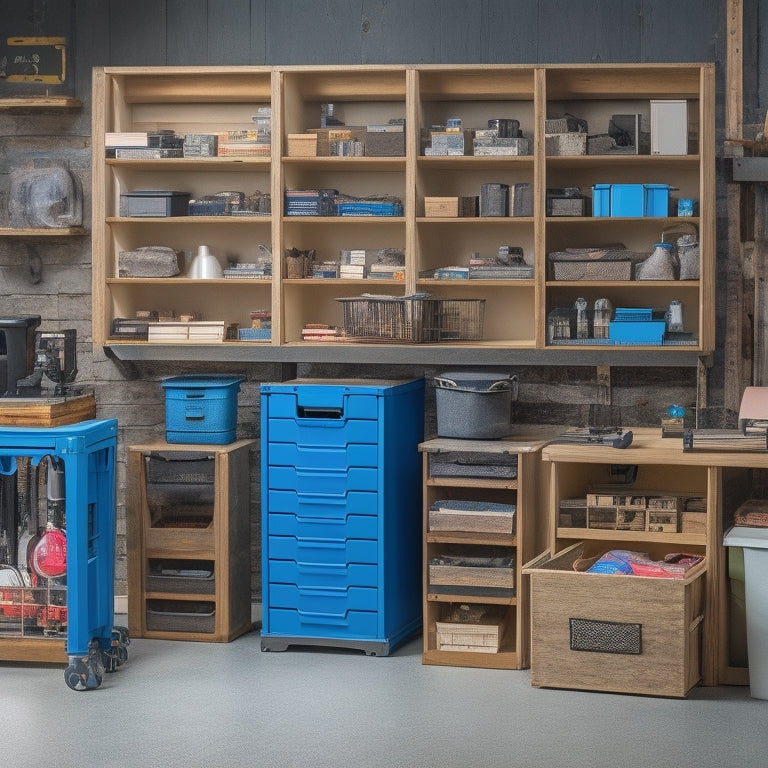
Innovative DIY Organizer for Harbor Freight Boxes
Create a clutter-free workspace with a custom DIY organizer for Harbor Freight boxes. Maximize vertical storage by designing a multi-level system that accommodates the standard dimensions of all 12 cases. Incorporate customizable compartments for easy categorization and effortless item retrieval. Guarantee a snug and organized fit by implementing clever organizing hacks like dividers and baskets. To take your storage system to the next level, explore advanced customization ideas and learn how to tailor your space to specific needs, revealing a harmonious and efficient workspace that boosts productivity. Explore further to discover the full potential of your DIY organizer.
Key Takeaways
• This DIY organizer maximizes vertical storage for Harbor Freight boxes, accommodating each level's standard dimensions for efficient use of space.
• Customizable compartments and dividers enable easy categorization and effortless item retrieval, ensuring a snug and organized fit for all 12 cases.
• A well-thought-out categorization system and clever organizing hacks like baskets and labels maintain clutter control and create a harmonious storage system.
• Specialized inserts, color coding, and visual categorization enable easy identification and quick access to contents, tailoring storage space to specific needs.
• The innovative DIY design ensures impressive accessibility features, making it easy to store and retrieve items while maintaining a tidy workspace.
DIY Organizer Design Features
The DIY organizer for Harbor Freight storage boxes features a space-efficient design that maximizes vertical storage, with each level spaced to accommodate the boxes' standard dimensions, ensuring a snug and organized fit for all 12 cases.
This clever design allows for customizable compartments, making it easy to categorize and locate specific items. The efficient storage system also boasts impressive accessibility features, enabling you to effortlessly retrieve and store items without straining or struggling.
Organizing Made Easy Essentials
To ensure the DIY organizer for Harbor Freight storage boxes lives up to its promise of keeping items organized and easily accessible, it's essential to focus on the fundamental elements that make organizing a breeze, starting with a well-thought-out categorization system. This will enable you to separate items into logical groups, making it easier to find what you need when you need it.
Next, incorporate clever organizing hacks, such as using dividers or baskets to maximize space optimization. By implementing effective storage solutions, you'll be able to maintain clutter control and keep your workspace tidy.
With these essentials in place, you'll be well on your way to creating a harmonious and efficient storage system that makes the most of your Harbor Freight boxes.
Storage Box Customization Ideas
Customizing your Harbor Freight storage boxes with specialized inserts and compartments can greatly enhance their functionality, allowing you to tailor the storage space to your specific needs.
One clever approach is to implement color coding and label making to categorize and identify contents at a glance. This visual system helps you quickly locate what you need, reducing frustration and increasing productivity.
For best space optimization, consider designing stackable solutions that maximize vertical storage while maintaining ease of access.
Frequently Asked Questions
Can I Customize the Organizer to Fit Different Storage Box Sizes?
When working with storage boxes of varying sizes, customization is key. To create a custom fit, start by measuring the dimensions of your unique box size.
Then, adjust the organizer's design to accommodate the new measurements, using materials like wood or 3D printed components.
How Do I Ensure the Organizer Remains Stable on Uneven Floors?
'When life gives you lemons, make lemonade' - but when life gives you uneven floors, make sure your DIY organizer stays put!
To guarantee stability, start by evaluating the floor's levelness. Use floor leveling tools to identify any discrepancies.
Next, install anti-tip brackets on the bottom of the organizer to prevent it from tipping over.
Are There Alternative Materials Besides Wood for Building the Organizer?
When building an organizer, stability and durability are key. Instead of wood, consider alternative materials like metal frames, which provide a sturdy base, or plastic inserts, which offer flexibility and ease of cleaning.
To get started, assess your storage needs and design a layout that suits your space. Then, source your materials and begin assembling your organizer, piece by piece, ensuring a snug and secure fit for your items.
Can I Add Casters or Wheels for Easy Mobility?
Imagine effortlessly gliding your DIY masterpiece across the room like it's on wheels of fire!
When adding casters or wheels for easy mobility, consider the type: heavy-duty, soft-roll, or locking casters.
Strategically place wheels at the base, ensuring even weight distribution.
Visualize the path your organizer will take, and position wheels accordingly.
With a few screws and some careful planning, your once-stationary creation will be rolling smoothly in no time!
How Do I Prevent the Organizer From Collecting Dust and Debris?
The age-old nemesis of DIY organizers: dust and debris! To keep your creation spick and span, consider applying dust repellent coatings to the surfaces.
Next, incorporate airflow design principles by adding ventilation gaps or mesh panels to promote air circulation. This will help prevent dust from settling and make cleaning a breeze.
Related Posts
-
Why Cluttered Bedrooms Are a Thing of the Past
You've finally said goodbye to cluttered bedrooms, thanks to innovative storage solutions that have revolutionized th...
-
3 Best Online Courses for Home Organization Skills
You're just a few clicks away from a clutter-free home and a more efficient daily routine. Three online courses can h...
-
7 Essential Android Apps for a Clutter-Free Home
You're just a few taps away from transforming your cluttered space into a serene and organized oasis. Start by gamify...


