
Transforming Studio Bedrooms With Customized Storage Solutions
You're about to reveal the secret to a clutter-free studio bedroom oasis. Start by evaluating your storage needs, measuring your space, and prioritizing essential items. Then, optimize your closet with categorized storage and maximize vertical space with floor-to-ceiling solutions. Customized furniture, like storage-packed bed frames and modular shelving units, will keep your belongings organized and out of view. Hidden drawer systems and creative concealment will further transform your space. With these solutions, you'll be well on your way to a serene retreat that's tailored to your unique style and needs. Now, discover how to bring it all together seamlessly.
Key Takeaways
• Assess storage needs by identifying clutter areas, categorizing items, and visualizing what to store and discard for optimal space utilization.
• Measure studio space accurately to create a functional floor plan, considering furniture placement, lighting, and obstacles like plumbing fixtures and outlets.
• Prioritize essential daily items, categorize them for efficient storage, and consider multi-functional furniture pieces for a minimalist design.
• Optimize closet organization by allocating space based on most-worn items, categorizing belongings, and implementing space-saving solutions like double rods and shelves.
• Utilize vertical space efficiently with floor-to-ceiling solutions, vertical shelving, and decorative hooks to maximize storage and create a larger room illusion.
Assessing Your Storage Needs
As you stand in your studio bedroom, take a 360-degree glance around the space to identify the areas where clutter tends to accumulate, and pinpoint the items you need to store, from clothing and accessories to books and decorative objects. This storage assessment is vital in determining the most effective storage solutions for your space.
Start by categorizing items into groups, such as 'keep,' 'donate,' and 'discard.' This decluttering tip will help you visualize what you need to store and what you can get rid of.
Next, examine your space utilization and think about how you can optimize it. Consider the areas where you spend most of your time, such as your workspace or reading nook. Think about how you can incorporate storage solutions that also serve as functional pieces, like an ottoman with storage or a desk with built-in shelves.
Measuring Your Studio Space
As you stand in your studio bedroom, take a moment to visualize the space.
You'll want to carefully record the room's dimensions, noting any obstructions or irregularities that could impact your storage design.
Studio Layout Assessment
Measure your studio space by mapping out the room's dimensions, including door and window locations, to create a precise floor plan that highlights the area's functional zones. This will help you visualize how you can optimize the space for your needs. Consider the room's purpose: will it be a sleeping area, workspace, or entertainment zone? Identify the zones that require specific furniture placement, decor ideas, and lighting options. Think about how color schemes can enhance the ambiance and functionality of each zone.
| Zone | Furniture Placement | Lighting Options |
|---|---|---|
| Sleeping Area | Bed, nightstand | Soft, warm lighting |
| Workspace | Desk, chair | Bright, task-oriented lighting |
| Entertainment Zone | TV, sofa | Dimmable, ambient lighting |
Room Dimension Recording
Grab your tape measure and graph paper, and get ready to meticulously record every nook and cranny of your studio space, from the width of doorways to the length of walls, to create an accurate blueprint for your customized storage solutions.
As you measure, think about how you want to utilize every inch of your space. Consider the furniture placement that will optimize functionality while maintaining a visually appealing design aesthetic. Note the dimensions of any windows, as these will impact your storage solutions and overall color schemes.
Take your time to record every measurement, no matter how small. The accuracy of your blueprint will directly impact the success of your customized storage solutions.
Don't forget to measure any obstacles, such as plumbing fixtures or electrical outlets, that may affect your design plans.
By carefully recording your room dimensions, you'll be able to create a tailored storage solution that not only meets your needs but also enhances the overall ambiance of your studio bedroom.
With your measurements in hand, you'll be ready to start designing a space that's both functional and beautiful.
Accurate Space Measurement
You're standing in your studio bedroom, tape measure in hand, ready to capture the exact dimensions of every wall, corner, and obstacle that will inform your customized storage solutions. This critical step in space planning ensures that your storage solutions are tailored to your unique space. To measure your studio space accurately, follow these steps:
| Area | Measurement | Notes |
|---|---|---|
| Wall 1 | 12 ft 5 in | Window on left, 3 ft from floor |
| Wall 2 | 9 ft 8 in | Doorway, 2 ft from floor |
| Wall 3 | 10 ft 2 in | Closet, 5 ft from floor |
| Wall 4 | 12 ft 1 in | Bed against wall, 1 ft from floor |
| Obstacles | Various | Note any pillars, vents, or other obstructions |
As you measure, consider the flow of your space and how you want to utilize each area. Think about the storage solutions you need, such as shelves, cabinets, or drawers. By taking exact measurements, you'll be able to design a space that is both functional and aesthetically pleasing. With precise dimensions, you'll be able to create a customized storage plan that maximizes your studio bedroom's potential.
Prioritizing Essential Items
With a studio bedroom's notoriously limited square footage, every item must earn its keep, so identify the essentials that make your daily routine hum, like a trusty alarm clock, a laptop, or a favorite reading lamp.
You'll be surprised at how many items you can live without, freeing up valuable space for what truly matters. By prioritizing these must-haves, you'll create a more streamlined, clutter-free environment that maximizes functionality.
To achieve a minimalist design, categorize your essentials into groups, such as 'tech,' 'reading,' and 'self-care.' This will help you visualize how they can be stored and accessed efficiently.
Consider multi-functional pieces, like a storage ottoman or a desk with built-in shelving, to keep your belongings organized and out of sight. By doing so, you'll create a sense of calm and serenity, allowing you to focus on what's truly important.
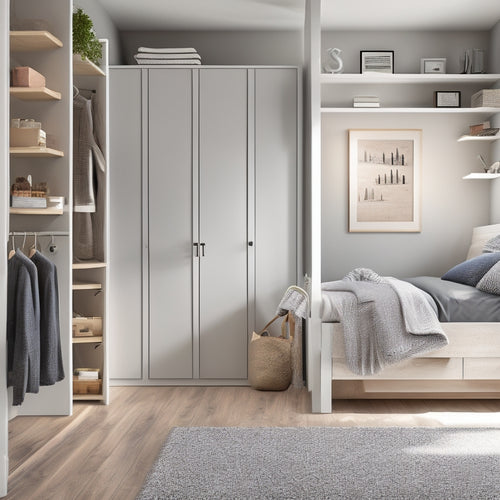
Optimizing Closet Organization
Transform your closet into a haven of efficiency by mapping out a strategic layout that allocates space according to your most-worn items, frequency of use, and personal style. This pivotal step in closet optimization will help you maximize your space and reduce clutter.
Start by categorizing your belongings into groups, such as tops, bottoms, and dresses, and then assign a designated area for each group. Implement space-saving solutions like double rods, shelves, and bins to store items that are less frequently used.
Custom storage solutions can be tailored to fit your specific needs, ensuring that every item has a designated home. Consider installing shelves with built-in drawers or adding stackable bins to store accessories like hats, scarves, and belts.
Organizational hacks like using dividers, hooks, and baskets can also help maintain a clutter-free closet. By optimizing your closet's layout and incorporating custom storage solutions, you'll be able to find what you need quickly and easily, making your morning routine more efficient.
With a well-organized closet, you'll feel more in control and focused, ready to take on the day.
Utilizing Vertical Space Efficiently
As you've optimized your closet's layout, now turn your attention to the often-underutilized vertical space, where floor-to-ceiling storage solutions can reveal hidden capacity and create a sense of airy openness. Vertical shelving is a great way to maximize storage while keeping the floor clear. Install shelves that reach the ceiling to store out-of-season items, linens, or luggage.
Add decorative hooks to hang jackets, hats, or bags, keeping them organized and easily accessible. Floating shelves can also be used to create a sense of openness while providing additional storage. Use them to display decorative items, books, or plants, adding visual interest to your studio bedroom.
Hanging organizers, such as shoe organizers or hanging cubbies, can be attached to the back of a door or a wall, providing additional storage for shoes, accessories, or clothing. By utilizing vertical space efficiently, you can create the illusion of a larger room while keeping your belongings organized and within reach.
With a little creativity, you can transform your studio bedroom into a clutter-free oasis that's both functional and stylish.
Customizing Furniture for Storage
As you reimagine your studio bedroom, you're likely thinking about how to maximize every inch of space.
When customizing your furniture for storage, you'll want to focus on pieces that serve multiple purposes, like bed frames with built-in drawers or shelves.
Space-Saving Bed Frames
By elevating your bed on sleek, storage-packed frames, you can access a wealth of hidden space in your studio bedroom, perfect for stashing luggage, out-of-season clothes, or even a home office. This clever solution allows you to maximize your floor space while keeping your belongings organized and out of sight.
Consider investing in a loft bed with built-in hidden compartments, where you can store linens, books, or even a laptop. The space underneath the bed can be utilized for a desk, a reading nook, or even a small gym area.
For a more minimalist approach, opt for a platform bed with built-in drawers or shelves. This design provides ample storage for clothes, shoes, and accessories while maintaining a sleek, low-profile aesthetic. Some bed frames even feature pull-out storage bins or slide-out shelves, allowing you to access your belongings with ease.
Modular Shelving Units
You can further amplify your studio bedroom's storage capacity by incorporating modular shelving units that let you customize your furniture to fit your unique needs and style. These units offer endless possibilities for creative display and functional design, allowing you to create a space that's both beautiful and practical.
Here are some benefits of incorporating modular shelving units in your studio bedroom:
-
Flexibility: Modular shelving units can be easily rearranged or added to as your storage needs change.
-
Personalization: Choose from a variety of materials, colors, and configurations to create a look that's all your own.
-
Optimized storage: Make the most of your available space with shelves that can be adjusted to fit items of different sizes.
- Visual appeal: Modular shelving units can be designed to create a visually appealing display of your favorite decorative items or treasured possessions.
Hidden Drawer Systems
Five cleverly concealed hidden drawer systems can transform your studio bedroom's furniture into multi-functional storage powerhouses, cleverly tucking away clutter while maintaining a sleek, streamlined aesthetic. These secret compartment designs seamlessly integrate into your existing furniture, creating space-saving solutions that are both functional and stylish.
You can opt for a hidden drawer system within your bed frame, providing a convenient storage space for linens, out-of-season clothing, or personal items. Alternatively, consider a dresser with hidden compartments, allowing you to stash valuables or sensitive items out of sight.
Innovative storage ideas like these enable you to maximize functionality while maintaining a clutter-free environment. When designing your hidden drawer system, consider the flow of your room and the items you need to store. By thoughtfully planning your storage solutions, you can create a harmonious balance between form and function.
With a little creativity, you can turn any piece of furniture into a multi-functional storage hub, freeing up valuable space in your studio bedroom.
Creating Hidden Storage Areas
Tuck away clutter in cleverly concealed compartments, like a storage ottoman or a platform bed with built-in drawers, to free up floor space and maintain a sense of openness in your studio bedroom. By incorporating creative concealment into your design, you can keep your belongings organized without sacrificing style or aesthetics.
Here are some ideas to get you started:
-
Secret Compartments:
Install hidden compartments in your furniture, such as a dresser with a hidden drawer or a nightstand with a secret storage compartment. -
Window Seat Storage:
Build a window seat with storage bins or drawers to stash away linens, out-of-season clothing, or luggage. -
Headboard Hiding Spots:
Design a headboard with built-in storage, like shelves or cabinets, to keep books, decorative items, or personal treasures within reach.
-
Step Storage:
Incorporate storage into your stairs, if you have a loft bed, to store items like shoes, bags, or cleaning supplies.
Selecting Multifunctional Pieces
By incorporating versatile pieces into your studio bedroom design, you'll not only maximize space but also create a harmonious, clutter-free environment where every element serves a purpose. These innovative pieces will help you strike the perfect balance between functionality and style.
For instance, consider a storage ottoman that doubles as a coffee table or a desk with built-in shelving. These types of pieces will enable you to maintain a sense of openness while keeping your belongings organized.
When selecting versatile pieces, it's crucial to weigh functionality vs. style. While a stylish piece might catch your eye, it's vital to make sure it serves a purpose beyond aesthetics. On the other hand, a functional piece that's visually unappealing can disrupt the harmony of your space.
Look for budget-friendly solutions that combine both aspects, such as a storage bed frame with a built-in headboard or a dresser with a mirror attached. By doing so, you'll create a space that's both beautiful and functional, making the most of your studio bedroom's limited square footage.
Implementing Aesthetically Pleasing Solutions
As you curate your studio bedroom's customized storage solutions, incorporate visually appealing elements that create a sense of serenity, such as soft-close drawers, rounded edges, and subtle hardware, to craft a calming oasis that exudes style and sophistication.
To take your design to the next level, consider the following aesthetically pleasing solutions:
-
Color coordination: Choose a palette that resonates with your personal style and complements the room's existing colors. This will create a sense of harmony and visual flow.
-
Decorative accents: Add ornate details, such as metallic hardware or patterned drawer pulls, to inject personality into your storage solutions.
-
Minimalist design: Opt for sleek, streamlined pieces that maximize functionality while maintaining a clutter-free appearance.
- Textured elements: Incorporate varied textures, like wood, metal, or glass, to add depth and visual interest to your storage solutions.
Frequently Asked Questions
Can I Customize Storage Solutions for a Studio With a Murphy Bed?
You can definitely customize storage solutions for a studio with a Murphy bed. Consider space-saving furniture, like wall-mounted shelves, and organization hacks, such as hidden storage options, to maximize your room's functionality.
How Do I Balance Storage and Style in a Small Studio Bedroom?
"Oh, you want to balance storage and style in a tiny studio bedroom? Good luck with that! Just kidding, sort of. You'll need decorative organization and hidden storage to marry functionality with aesthetic appeal - think sleek shelves and stylish baskets."
Are Customized Storage Solutions Worth the Added Expense?
You're wondering if customized storage solutions are worth the added expense, and the answer is yes, if you prioritize cost effectiveness, functionality, and aesthetics, as they'll enhance your space's practicality and visual appeal.
Can I DIY My Own Customized Storage Solutions or Hire a Pro?
You're weighing DIY options against professional help for customized storage solutions. If you're handy and have design chops, DIY might work, but if you're short on time or need complex installations, consider hiring a pro for a flawless finish.
How Often Should I Reassess and Update My Storage Solutions?
You'll want to reassess your storage solutions every 6-12 months, considering changes in your lifestyle and habits, to make sure they still meet your needs, and update them accordingly to maintain a clutter-free, functional space that adapts to you.
Related Posts
-

What's the Secret to Organizing Digital Clutter?
You're tired of feeling overwhelmed by digital mess, wasting time searching for lost files and drowning in a sea of d...
-
7 Clever Hacks for Small Bedroom Storage
You're about to discover the secret to revealing generous storage in even the smallest of bedrooms. Start by maximizi...

